Wednesday, August 06, 2014
Using Win + L to lock your computer is boring nowadays because
every time you need to unlock your computer you need to enter password. It is
frustrating sometimes. So its a cool idea to make your system unlock without
entering password, just you need to do is plug your USB drive and your Computer
get unlock, isn’t it cool…!
What is Password Booster Screen Lock ?
Password Booster Screen Lock is a
small software program that lets you lock/unlock your computer using USB drive.
You don’t need to enter password every time you want to unlock your computer. It
minimizes your work of typing a password every time when you are waking up your
system from sleep or lock mode.
How to use Password Booster Screen Lock
?
It is very easy to use software program and anyone
can handle it with ease. It gets automatically enabled when you install it in
your computer. After installation you can see a green icon in your system tray.
Download it from here.
*. After installation click on the green icon to see the window
for your USB drive setup.
*. Now click on Setup and then select
Enroll a flash drive then connect your USB flash
drive. It will automatically detect the flash dive and configure it for
locking/unlocking purpose.
*. Now whenever you remove your USB flash drive your computer
gets automatically locked and connecting it will automatically unlock your
computer.
You can enable or disable it by simply right
clicking on the icon from the system tray. That’s it! you are free from the
boring password unlock.
You are in the situation where you may need to hide your
personal work from others like friends or family or just need to hide from
anyone. But you are not able to do this normally, but don’t worry you are now do
this and you may not need to take your computer to sleep every time.
One software tool is in a help for you for this. Name of the
software tool is AntiSnooper. AntiSnooper is available for everyone to use. You
have an option to purchase it or you can use it freely. This is very simple to
use software that anyone can use easily.
How to use AntiSnooper ?
AntiSnooper is very easy to use you can download it from their
official website here.
*. After installation you will be presented with the Window as
shown in the screenshot below.
*. All the active programs will be shown in that Window. You can
see the currently active window there, when you are working on it.
*. Now click on the green plus icon
and your program will be protected with AntiSnooper.
*. When you remove your cursor from that program you can see
that its window becomes blurred.
*. For removing protection again click on that icon and your
protection will be removed.
You are now protected with AntiSnooper. It’s
very cool to use and protect your privacy. Use it and share with
friends.
When you are burning files on CD/DVD and if some files not
burned properly on the disk you may cause the error like this. This error shows
near your system tray and you can’t able to remove that kind of
error.
This kind of error have to be fix by most of the Windows users
but unable to fix it after removing CD/DVD and completed burning files to
it.
What is the cause of this error ?
This error cause due to temporary storage of files into your
systems temporary storage folder. If you didn’t burn some of the files that
stored into that folder then this error continue to show near your system
tray.
How to fix the error ?
Fixing this error is not that much hard thing to do. You are now
able to fix this error by using simple Run commands or by just opening the
folder.
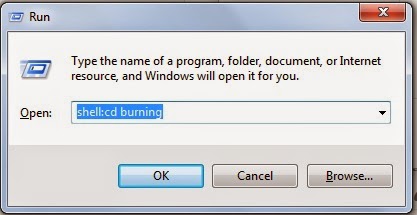
*. Open Run directly by pressing Win + R. Now type
shell:cd burning and press Enter.
*. You will prompt a Window in which temporarily files were
stored during burning process. You just need to delete that files and you are
done.
OR
*. Open the folder located at
C:\Users\<Username>\AppData\Local\Microsoft\Windows\Burn\Temporary
Burn Folder and delete all the files stored in that
folder.
Note: This folder is hidden by default and may not open
directly, so first check that you have checked show hidden files and folder
option from folder and search options.
You are now able to fix this issue easily and
not teased with this issue again.
There are lots of tools available for Windows that
are very useful in your day to day life. One of them is
Recordit. It is a very easy to use software for
Windows by which you can capture your screen in GIF file i.e. you can record
your screen activities in the form of GIF files and save them or upload them on
the web.
As GIF files don’t need more space they are easy
to share on the Internet and you can able to make videos of your screen
activities with this simple tool Recordit.
How to record your screen in GIF
You need Recordit software for making your GIF
videos of your computer screen. It is free software for Windows. You may direct
upload GIF files to the Recordit servers from where you can further use the file
on the web or download it for your own use. It is available in a free as well as
a paid version. We are discussing about the free version now.
With free version of Recordit you can record the computer screen
for upto 5 minutes which more than enough for any GIF file. You can download
Recordit from here.
*. After downloading and installing you will see a small camera
icon in your system tray. You just need to click on that and then select the
area for recording and click on Record
button.
*. Once you are done with the recording you can click on
Stop button to stop the recording or you can also
click on flashing icon for Stop from your system tray.
*. Now Recordit will automatically upload the video on the
server after which you will be notified by a small system tray icon. You can
click on it to view the video.
*. To download the created video you must click on the GIF
button on the bottom right corner of the video player and then right click on
the GIF file opened and then click on Save image
as.
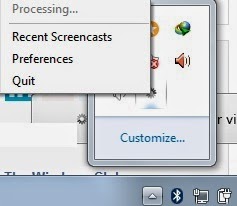
*. You can view previously created videos by clicking the
Recent Screencast menu from the system tray
icon.
Recordit is very easy to use software by
which you can create your free GIF screen videos which are very small in size.
So enjoy creating GIF videos of your computer.


