Are you frustrated the way online colleges and schools blocking websites? Did you just hate Cyberoam blocking sites in colleges. Don't worry now we have a solution for you. These days crazy Internet surfers like us are always want to access torrents, facebook, twitter and other social services in offices, schools and colleges also but the firewalls of these institutions are also becomes very stronger and cannot be bypassed easily but thanks to Cocoon these restrictions can also be overcome easily.
What is Cocoon?
Cocoon is basically a browser add-on which is used to bypass internet restrictions. According to the cocoon developers,
"Cocoon is an all-in-one plugin that makes everything you do online secure, virus-free and private. Without Cocoon websites and hackers have access to your computer to leave cookies or infect it with viruses and malware. You even get protection on open Wi-Fi access points."
There are number of advertisers who track your every move, hackers in a hurry to steal your passwords and viruses needs a chance to attack your computer. To avoid all this you want something that hide you from the threatening things of the Internet world and here comes the Cocoon.
Cocoon is available for Firefox, Google Chrome and Internet Explorer that helps you browse the Web securely in an anonymous environment. Cocoon is available for free download and also available in paid version that is also known as Cocoon+.
How Cocoon works?
Cocoon uses a proxy service, so that all of your browsing is done through Cocoon's servers. All the web sites that you browse see their IP address or ISP instead of tracking you.
Cocoon scan files before you download ensuring that your computer won't be attacked by any malware.
How to use Cocoon?
Using Cocoon is very easy and don't need any specific knowledge. To use Cocoon following steps will help you.
*. First of all signup for a cocoon free account from https://getcocoon.com/signup_free and then download Cocoon add-on from the official website https://getcocoon.com/support/download
Note: If download not works then you can download from following link directly https://getcocoon.com/downloads/vwc_cocoon.xpi?303486
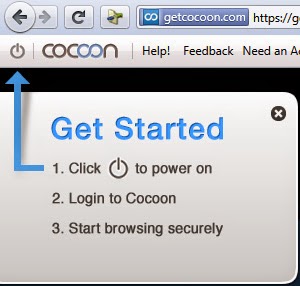
*. After install you need to restart your browser and you will see a Cocoon toolbar. Just press the power button and you will see a Email address and Password fields.
*. Now enter your email address and password that you used while sign up process and click on Go.
*. Now Cocoon will start attempt to login from different proxies and in a few seconds you will be connected to the Cocoon's private world.
*. Now open any website that is previously blocked and enjoy browsing anonymously.
That's it, browse the web, bypass firewalls and Cyberoam restrictions with ease.


