Windows users should be aware of the Print Screen option available in Windows which allows users to capture their working screen. But whenever you want to see the captured image you have to paste it into any type of image editor such as MS Paint and then you can save it.
But you can save it directly into your desired directory. Don't know how? You will able to know it from following post.
How to save screenshot automatically
For this you need a small tool named as Screen Sniper. It is very small application and will not consume more memory of your system.
Follow following steps to get your screenshot image in your desired folder.
*. Firstly download Screen Sniper from here.
*. After installation you will see Screen Sniper icon in your tray.
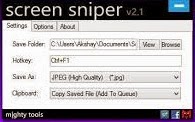
*. You can right click on it and click on Show Screen Sniper, for selecting the directory in which you want to save your screenshot and also the hotkey (default is PrtScr & you can customize it). Also you can change the format of image you want to save.

*. Now you are ready to take a screenshot. As you do previously just press the PrtScn button on you keyboard and within a second your screenshot image will be saved into the folder you selected.
Just enjoy with this small and useful post. Stay connected with TechAntic for more tips.


0 comments:
Post a Comment