Monday, 13 February 2023

ChatGPT and Its Power: Exploring the Capabilities of a Language Model

chatgpt


As technology continues to evolve, it’s no surprise that artificial intelligence (AI) is at the forefront of many new innovations. One of the most promising examples of AI is ChatGPT, a large language model developed by OpenAI. This model has the ability to generate human-like responses to natural language queries, making it a powerful tool in a variety of applications.

So what makes ChatGPT so special, and how can it be used to unlock new capabilities? Let’s explore some of its key features and use cases.

Natural Language Processing

*. At its core, ChatGPT is a natural language processing (NLP) tool. It has been trained on a vast corpus of text data, allowing it to understand and generate responses to a wide variety of queries. This makes it an ideal tool for chatbots, customer service applications, and any other scenario where human-like responses are required.

*. In fact, many businesses are already using ChatGPT to improve their customer service capabilities. By integrating the model into their chatbots or other customer-facing applications, they are able to provide fast and accurate responses to a wide range of queries. This can help to improve customer satisfaction and reduce the workload for human agents.

Content Creation

*. Another key use case for ChatGPT is content creation. Because the model is trained on such a vast amount of text data, it has a deep understanding of language and can generate high-quality content on a wide range of topics. This can be useful for businesses that need to generate large amounts of content quickly, such as news outlets or marketing agencies.

*. But it’s not just businesses that can benefit from ChatGPT’s content creation capabilities. Bloggers and content creators can also use the model to generate ideas for articles or to help with writer’s block. By entering a few keywords related to a topic, ChatGPT can generate a list of related topics or even complete outlines for articles.

Limitations

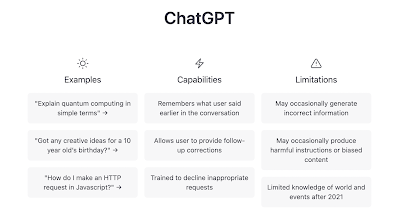
*. Of course, like any tool, ChatGPT has its limitations. While it is incredibly powerful, it is not infallible. The model can sometimes generate responses that are inaccurate or even offensive, particularly if it is fed biased or inappropriate data.

*. It’s also worth noting that ChatGPT is not a replacement for human agents or content creators. While it can certainly help to automate certain tasks, there is still a lot of value in human creativity and expertise.

Conclusion

Despite its limitations, ChatGPT is an incredibly powerful tool with a wide range of use cases. Whether you’re looking to improve your customer service capabilities or generate high-quality content, this language model can help you achieve your goals. As AI continues to evolve, it’s clear that ChatGPT will be a key player in shaping the future of natural language processing and content creation.

To access ChatGPT go to https://chat.openai.com/chat and login/signup using your Google or Microsoft account. Explore all the new possibilities you could do with this AI bot :)

Friday, 13 July 2018

How to set up E-mail server for local development

Many developers look for a solution to test mail functionality for their local development work in order to test if the email functionality working fine or not, before they can proceed with deployment on actual production server. To ease up this task we are here with an easy to use and configurable solution for running your SMTP server on local development environment.

Local Mail Setup

*. Download hMailServer from https://www.hmailserver.com

*. After completing the download open hMailServer Administrator.

*. To connect hMailServer click on Add in admin panel and provide Host name as “localhost”. Keep other fields as it is.

hMailServer administrator

*. Now click on just added localhost and click on Connect, when prompted . This will open hMailserver Administrator panel.

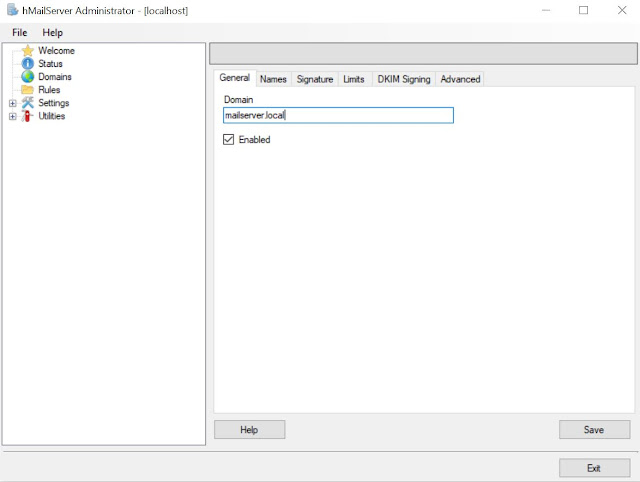
*. To start using hMailserver you need to add domain, under Domains section. To do so click on Add domain to add the domain, provide your local domain name and click on save.

local domain name

*. Next step is to setup an account. Click on Domains -> (Your domain) -> Accounts -> Add and provide any name for your account e.g. ‘techantic’ and click save. You can also provide password but this is not mandatory. Keep rest of the fields as it is.

domain account setup

*. Now mail server is ready to use. Next step is to configure your local e-mail.

Configuring Local Mail

*. Download Mozilla thunderbird Mail client from here https://www.thunderbird.net

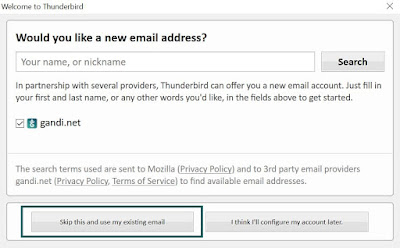
*. After download and install open Thunderbird client and click on “Skip this and use my existing email”

skip setup


*. This will prompt you to enter your e-mail address. Enter your e-mail account that you just set up on hMailServer and the password of hMailServer admin and click on Continue.

*. Now you need to update server host name as 127.0.0.1 for both IMAP and POP3. Also select port as 143 for IMAP and 25 for SMTP and click on Re-test. Finally click on Done.

mailserver settings


*. Now your local e-mail setup is complete, you can use the local mail server for your local application development.

To configure settings in your config file of your development application under mailSettings -> smtp in from attribute put your local e-mail id and under mailSettings -> network in host attribute put your local application address and make sure value of port is 25.

mail config settings


That’s it! You can test your mails on your local development machine J

Tuesday, 27 March 2018

How to create Android app without coding

Building any software is never an easy task. It requires a lot of knowledge in various programming technologies like Java, C#, JavaScript, AngularJS, HTML, CSS and many more, the list is never ending. But not to worry as anyone with basic Internet connectivity can easily create Android apps and that's also without any cost. Isn't it interesting? ☺

How to create an android app


android logo


Creating android app is now easy and anyone can create the app right away. We are introducing you with Thunkable. The website that you can use to create quality android apps on your own.

Steps to create an app:

*. Go to https://thunkable.com and create an account, it's free.

*. Verify your e-mail and login to  your account in Thunkable.

*. You will be presented with an interface to create an app.

*. Click on Create New app and you will be prompted to give a name to your app. give any suitable name and click OK to proceed for app designer.

thunkable app designer panel


*. Under app designer you will find various tools/Palette on left side like button, Image, Label,         TextBox etc. 

*. In middle you can see your virtual mobile phone emulator where you will be able to view your app progress like you will see in real phone.

*. On right you can find Components and Properties windows where you can customize your app items. They are self explanatory though.

*. To start creating you app, just drag and drop Palette items like Button, Label, etc. to your virtual mobile phone emulator and customize them according to your needs under properties window.

*. You can also add multiple Screens to your Android application.

*. After completing your Screen1 if you want any action to be done and want your app to open another screen like Screen2 after a button click you can switch to Blocks mode where you can specify your logic to connect multiple screens, math operation, managing control statements like if....else etc.

thunkable block arrangement panel


*. After completing your app designing you can see it's working live, to do so just click on Test -> Thunkabel Live and you will be prompted with QR code which you can scan from your mobile and try your own app on your phone. (If you don't have QR code scanner you can download Thunkable mobile app and scan the QR code)

thunkable live QR code

*. At last you can export your .apk app file to your computer or you can download it on your mobile using QR code to do so go to Export -> App ( save .apk to my computer).

That's all. It's pretty easy isn't it? Do put your comments below and let us know if you have any doubts or questions.

Saturday, 20 June 2015

How to accept all Friend Requests at once on Facebook

Facebook as everybody know the largest social networking website. Everyone likes to be on Facebook and chat with friends, share photos, make friends, share stories and lot more. Most people using Facebook like to make lot of friends and some people may got hundreds or thousands of requests everyday. So it is very difficult for them to confirm these requests easily and if you have a slower connection then it is going to be very much frustrating task. But here on TechAntic we are always want to make your life easy with simple tricks that works.

pending facebook friend requests

Is this trick work ?

It will be work for most of the people and I have tried it personally and you don't have to misunderstand this trick is hacking or something. It is simple programming code which simplify your task.

How to Confirm or Accept Friend Request at once ?

*. First of all you need to log in to Facebook. Go to https://www.facebook.com/reqs.php

*. You will find out all the pending requests on this page if you have lot of friend requests then you have to click on Show more. Click on this until all the friend requests are visible.

*. Now right click anywhere on the page and click on Inspect Element and then click on the Console tab and paste following code as it is

javascript:for( i = 1;i<document.getElementsByName("actions[accept]").length;i++){document.getElementsByName("actions[accept]")[i].click();}void(0);

confirm facebook friend requests using inspect element

Note: If you're using Inspect Element in Firefox for the first time then it may possible that Firefox won't allow you to do that. If it happens then type enter on the Console panel and you are now allowed to paste.

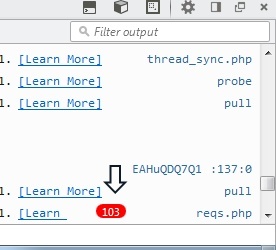
After all this process completed successfully you will see something like this as shown in the screenshot below. It means that your friend requests are started confirming automatically. Wait for sometime and all your pending requests will be accepted.

confirm accept friend request automatically

Hopefully this post helped you and you would enjoy using it. Keep in touch with us and don't forget to share the post.

Popular Posts